Table of Contents
The standing heel raise is the most important exercise for both seniors and people over 50.
Why the heel raise exercise and not the squat?
The squat is an important exercise. But, whether you like it or not, you have to sit down and get up from a chair or the toilet several times a day. Each time you do that movement, you do a squat.
The heel raise (or heel lift) movement, on the other hand, is seldom done on a daily basis by people in their fifties and older.
The muscles located in your calf area are responsible for performing the heel raise.
These muscles give us a spring in our step, agility on the court, and grace on the dance floor.
They impact how well you move as you age.
The Heel Raises Exercise
I find that 99% of the people I see over the age of 50 lack strength and endurance in this muscle.
They do not have enough strength in their calf muscles to support their everyday movements — whether that be walking, climbing stairs, or many other day-to-day activities.
Unfortunately, heel raises are not part of most people’s everyday movement pattern.
Fortunately, heel raises are easy to do even for those of you with hip or knee issues. And they take relatively little energy and time to do.
We start with the basic heel raise. Then we cover step wise progression to an advanced heel raise. At this point, you will have the strength you need if you love to dance, play racket sports, or hike.
In fact, there is a self evaluation you can do to see how strong these muscles are.
Today’s post covers that self evaluation as well as a variety of heel raise exercises you can do to increase calf strength.
Heel Raise or Heel Lift Exercise?
I have seen the heel raise exercise called the heel raise exercise on other websites. In this post, I will refer to the exercise as the heel raise.
Can’t Do Standing Heel Raises or Heel Lifts?
Can’t do the standing heel raise exercise?
Not to worry. Near the end of this post I provide strategies for those of you unable to do the heel raise because of physical limitations.
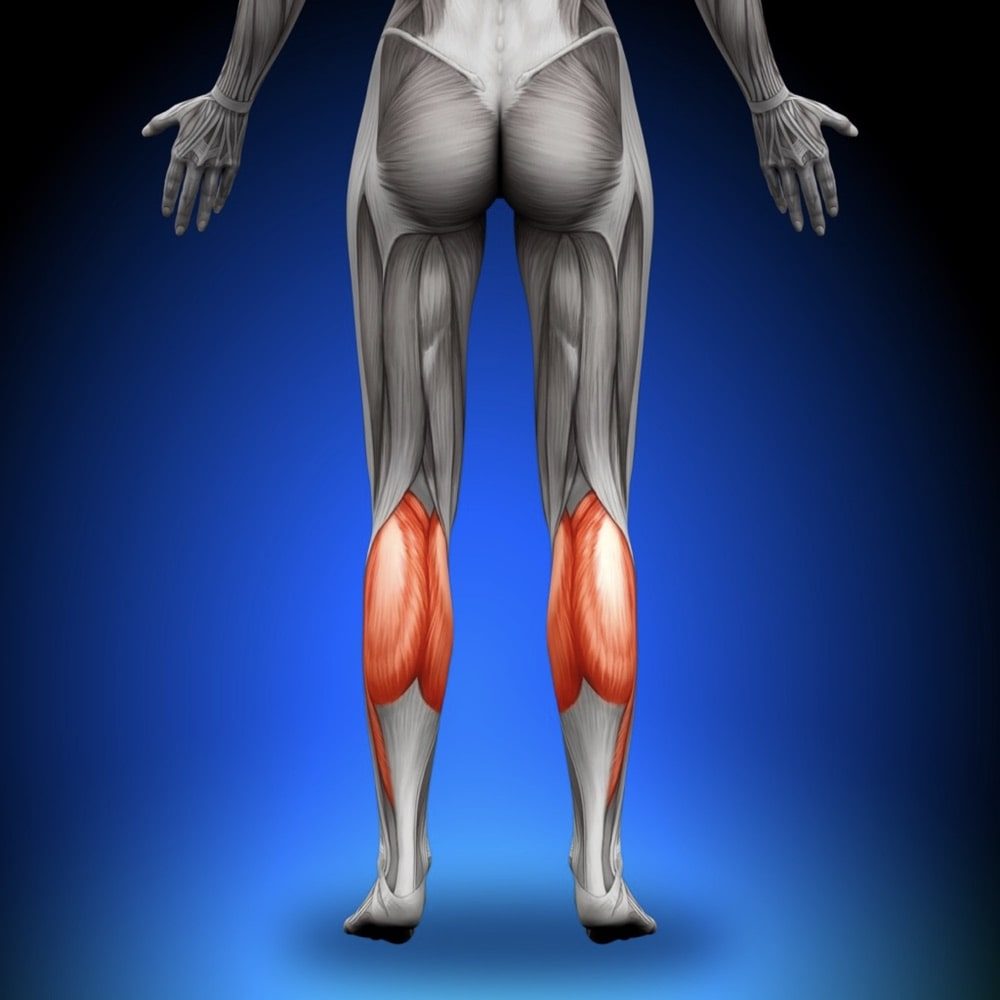
Before we get to the exercise demonstration, let’s cover the muscles worked by the heel raise exercise.
Muscles Worked by the Heel Raise Exercise
The heel raise works the muscles located in the calf area — namely, the gastrocnemius and soleus muscles.
The gastrocnemius has two heads that originate just above the knee.
The soleus is attached at the back of the tibial bone.
Together with a third muscle — plantaris — they fuse to become the strongest and thickest tendon in our body: the tenocalcaneous.
The tenocalcaneous tendon starts out wide and flat. As it gets into the lower leg, it narrows and is often referred to as the achilles tendon.
When it reaches the calcaneous, or heel bone, it expands again to insert into the back of the heel bone.
Muscle Function in the Lower Leg
The gastrocnemius has two jobs.
First, it works with the hamstring muscles to bend the knee.
Second, the gastrocnemius teams up with the soleus to allow the foot to point — like a ballerina’s stance.
(Ballerinas have beautifully developed calves because of the many hours they spend lifting up and down on their toes, as well as performing thousands of jumps.)
Thankfully, you do not need to have the calves of a ballerina to age gracefully. The heel raise exercise that follows will give you what you need to stay agile and mobile.
Benefits of Heel Raise Exercise
The heel raise or heel lift exercise has a number of benefits. The heel raise exercise increases the strength in the muscles of the calf. This, in turn, will help you when you walk, jump, or run.
When you go through the full suite of heel raise exercises in this post, you will restore the spring in your step. You might even be able to try a few new dance moves.
Heel Raises Exercise Self Evaluation
A healthy older adult should easily be able to do the single leg heel raise (described later in this post.) When I graduated Physical Therapy school in 1984, the recommended standard was 20 single leg heel raises in one set.
I recently reviewed the current research and find that the recommendation is 5 consecutive single leg heel raises in one set. It seems as though our standard for fitness has, sadly, dropped.
If you cannot do 5 consecutive single leg heel raises, you should follow the progression I recommend in this post.
Tips Before You Do Any Heel Raise Exercises
I have a few tips and suggestion to cover before we jump into the heel raise exercise variations. We will start with a discussion on weight distribution.
Weight Distribution
You will note in the progressions (after the basic heel raise) that we start the first variation with weights (either body weight, weights you hold, or both).
We can do this because we raise and lower both heels (using both feet for support). Your weight (and the additional load) are distributed over two feet. If you are 120 pounds, for example, and we have you hold 20 extra pounds during the double heel raise, then the total weight you are pushing up is 140 pounds.
We can easily load this weight across two feet (70 pounds of load per foot) after having the completed the basic heel raise (without additional weight). This is because we are only adding 20 extra pounds between the exercises.
When we move to the single leg heel raises, we only use our body weight. The incremental load of extra weight will be too much of a graduation. Instead, we build up your calf strength until we know we can comfortably load a single leg.
Shoes and Surfaces
The following applies to general readers. If you have osteoarthritis in the feet, then read my section near the end of this post.
I suggest that if you do your heel raises standing on a soft surface, such as a thick carpeted floor or folded yoga mats, you can do the exercises barefooted.
If you are on a hard surface, such as a tile or wood floor, I recommend you wear shoes.
Make sure that the shoes have a flat surface. Running shoes (or any shoe with an elevated heel) reduces the range of the heel raise. We want to make sure that there is as much distance between your heel and the surface when your heel is elevated.
Basic Heel Raise Exercise — Body Weight Double Heel Raise
The basic heel raise exercise is the double heel raise using only your body weight.
Key parameters:
- Number of reps per set: 15
- Number of sets: 3
- Hold time at the top: one second
Here is how to do the exercise:
- Place one or both hands on a supportive surface for balance.
- Stand with equal weight on both feet.
- Raise both heels.
- Lower both heels simultaneously in a controlled manner.
- Gradually build to three sets of 15 repetitions.
- Allow at least a 2 minute rest period between sets.
- At the end of all of your sets and reps, follow up with a calf and soleus stretch.
Exercise Recommendations for Osteoporosis
Exercise is an essential ingredient to bone health. If you have osteoporosis, therapeutic exercise needs to be part of your osteoporosis treatment program.
But what exercises should you do and which ones should you avoid? What exercises build bone and which ones reduce your chance of a fracture? Is Yoga good for your bones? Who should you trust when it comes to exercises for osteoporosis?
A great resource on exercise and osteoporosis is my free, seven day email course called Exercise Recommendations for Osteoporosis. After you provide your email address, you will receive seven consecutive online educational videos on bone health — one lesson each day. You can look at the videos at anytime and as often as you like.

I cover important topics related to osteoporosis exercise including:
- Can exercise reverse osteoporosis?
- Stop the stoop — how to avoid kyphosis and rounded shoulders.
- Key components of an osteoporosis exercise program.
- Key principles of bone building.
- Exercises you should avoid if you have osteoporosis.
- Yoga and osteoporosis — should you practice yoga if you have osteoporosis?
- Core strength and osteoporosis — why is core strength important if you have osteoporosis?
Enter your email address and I will start you on this free course. I do not SPAM or share your email address (or any information) with third parties. You can unsubscribe from my mail list at any time.
Heel Raise Exercise Progression 1 — Double Heel Raise with Weights
Once you can comfortably do three sets (each set composed of 15 repetitions) of Body Weight Double Heel Raise exercise (above), the next progression is to do the Double Heel Raise with weights.
Options include wearing a weighted vest, weighted belt or a back-pack with weights. This approach keeps your hands free and evenly distributes the weight.
Alternatively, you can hold a dumbbell in one hand and keep the other hand on a stable support.
Gradually build up your strength so that you can wear some weight (using, for example, a weighted vest) while you hold the remainder.
Key parameters:
- Number of reps per set: 15
- Number of sets: 3
- Hold time at the top: one second
Here are the instructions:
- Use a weighted vest, belt or back pack.
- Place one or both hands on a supportive surface for balance.
- Stand with equal weight on both feet.
- Raise both heels.
- Lower both heels simultaneously in a controlled manner.
- Gradually build to three sets of 15 repetitions.
- Allow at least a 2 minute rest period between sets.
- At the end of all your sets and reps, follow up with a calf and soleus stretch.
Heel Raises Progression 2 — Two Up, One Down Heel Raise Exercise with 60% to 90% Weight Transfer
Do not use external weights when you do this progression. We will add weights in a later progression when you have built up enough strength to carry the additional load.
This version is a great prop-free progression from the weighted double heel raise exercise.
Key parameters:
- Number of reps per set: 15
- Number of sets: 3
- Hold time at the top: one secondHere are the instructions:
Place one or both hands on a supportive surface for balance.
- Stand with equal weight on both feet.
- Raise both heels.
- Shift as much weight as you can onto your right foot.
- Keep your heel high throughout the weight shift.
- Keep the left foot on the ground but unweighted as much as possible.
- Lower your right heel.
- Repeat with the left leg
- Gradually build to three sets of 15 repetitions on each leg.
- Allow at least a 2 minute rest period between sets.
- At the end of all your sets and reps, follow up with a calf and soleus stretch.
Heel Raises Progression 3 — Two Up, One Down Heel Raise Exercise with 100% Weight Transfer
Once you have a command of the Heel Raises Progression 2 (above), you are ready for the next challenge — the Two Up, One Down Heel Raise — but this time placing all of your weight on one foot.
You are well on your way to doing a single leg heel raise. Master this standing heel raise before moving to the single leg heel raise.
Key parameters:
- Number of reps per set: 15
- Number of sets: 3
- Hold time at the top: one second
Here are the instructions:
- Place one or both hands on a supportive surface for balance.
- Stand with equal weight on both feet.
- Raise both heels.
- Shift all your weight onto your right foot.
- Keep your heel high throughout the weight shift.
- Keep the left foot in the air and away from the right leg.
- Lower your right heel in a controlled manner.
- Repeat with the left leg.
- Gradually build to three sets of 15 repetitions.
- Allow at least a 2 minute rest period between sets.
- At the end of all your sets and reps, follow up with a calf and soleus stretch.
Heel Raises Progression 4 — Single Leg Heel Raise Exercise
Once you master the Two Up, One Down — 100% heel raise exercise, your next progression is the single leg heel raise exercise.
This exercise will restore your strength to the point where you can walk with a spring in your step, run and even hop.
Key parameters:
- Number of reps per set: 15
- Number of sets: 3
- Hold time at the top: one second
Here are the instructions:
- Place one or both your hands on a supportive surface for balance.
- Shift 100% your weight onto your right foot.
- Keep the left foot off the ground and away from the right leg.
- Gradually build to three sets of 15 repetitions.
- Allow at least a 2 minute rest period between sets.
- At the end of all your sets and reps, follow up with a calf and soleus stretch.
Heel Raises Progression 5 — Weighted Single Leg Heel Raise
The weighted single leg heel raise will give you the strength you need to hike hills and carry groceries up stairs with ease.
When you wear a weighted vest, weighted belt or a back pack with weights, you can keep your hands free and the weight evenly distributed.
Alternatively, you can hold a dumbbell in one hand and keep the other hand on a stable support.
Gradually build up your strength to the point where you can wear a weighted device (vest, belt or backpack) and also hold the free weights.
Key parameters:
- Number of reps per set: 15
- Number of sets: 3
- Hold time at the top: one second
Here are the instructions:
- Use a weighted vest, belt or back pack.
- Place one or both your hands on a supportive surface for balance.
- Shift 100% of your weight onto your right foot.
- Keep the left foot off the ground and away from the right leg.
- Gradually build to three sets of 15 repetitions.
- Allow at least a 2 minute rest period between sets.
- At the end of all of your sets and reps, follow up with a calf and soleus stretch.
Heel Raises for Hikers
Hiking up hills places considerable demand on the calf and soleus muscles and the achilles tendon. If you do not keep these muscles conditioned for this type of hiking, your dream holiday could quickly become a big disappointment or worse, a trip to the hospital.
If you hike with a pack, be sure to progress your calf strength so that you can do the single leg heel raise exercise with a weighted vest, belt or back pack.
Make sure that the weighted vest, belt or backpack that you train with is heavier than as the one you expect to carry on the trail. This will allow you to enjoy your hike.
Hiking up steep hills places considerable demand on the calf and soleus muscles and the achilles tendon. You often end up with your heel dropping lower than it would from a flat surface.
In order to train optimally, be sure to stand on a step or half foam roller that allows your heel to drop down below the horizon on the descent.
Be sure to followup the exercise with stretching your calf and soleus muscles.

Special Considerations for the Heel Raise Exercise
You might find that there are several constraints that limit your ability to do the heel raise exercise. We will go through each of these in this section.
Consideration for Osteoarthritis at the Base the Big Toe (1st Tarsal Metatarsal Joint)
Osteoarthritis brings unique challenges to the heel raise exercise. I discuss these here.
Mild OA
Individuals who have mild osteoarthritis at the big toe knuckle can usually manage heel raises wearing runners or using a thicker mat such as an Airex exercise mat or a folded yoga mat.
Moderate to Advanced OA
Doing your heel raises will give you all the benefit of the heel raises without any of the pain.
Place the knuckles of your feet at the apex of the 1/2 foam roller, or rolled up yoga mat. This will allow your toes to go down the far side of the roll as your heel(s) raises. Voila!
Heel Raises for Achilles Tendonitis
The “Two Up, One Down” heel raise exercise is important for anyone who suffers from achilles tendinitis.
The lowering phase is the eccentric phase. This phase has been shown to be beneficial when it comes to tendinitis.
Consideration for Bunions
If you have bunions, know that you can make them worse — but you can also make them better. I encourage you to do the latter.
Be sure your footwear is wide enough so that your big toe has lots of clearance and space at the top of the shoe.
Wear a toe spreader either between all your toes, as with the product Correct Toes, or at least between the big toe and the second toe.
Allow your big toe to experience its correct alignment. Given a chance it may never want to go back.
Hiking Tips
If you will be hiking with a pack, progress to doing the single leg heel raise exercise with a pack on your back or a weighted vest. The pack (or vest) should weigh the same as the one you expect to carry on the trail.
Depending on level of fitness, this progression might take several months. Be patient.
These exercises can be done daily.
Be sure to followup the exercise with a calf muscle stretch. These can be found in Exercise for Better Bones.
Exercise Recommendations for Osteoporosis
Exercise is an essential ingredient to bone health. If you have osteoporosis, therapeutic exercise needs to be part of your osteoporosis treatment program.
But what exercises should you do and which ones should you avoid? What exercises build bone and which ones reduce your chance of a fracture? Is Yoga good for your bones? Who should you trust when it comes to exercises for osteoporosis?
A great resource on exercise and osteoporosis is my free, seven day email course called Exercise Recommendations for Osteoporosis. After you provide your email address, you will receive seven consecutive online educational videos on bone health — one lesson each day. You can look at the videos at anytime and as often as you like.
I cover important topics related to osteoporosis exercise including:
- Can exercise reverse osteoporosis?
- Stop the stoop — how to avoid kyphosis and rounded shoulders.
- Key components of an osteoporosis exercise program.
- Key principles of bone building.
- Exercises you should avoid if you have osteoporosis.
- Yoga and osteoporosis — should you practice yoga if you have osteoporosis?
- Core strength and osteoporosis — why is core strength important if you have osteoporosis?
Enter your email address and I will start you on this free course. I do not SPAM or share your email address (or any information) with third parties. You can unsubscribe from my mail list at any time.
Heel Raise Exercise or the Heel Drop Exercise?
The progressive heel raise exercise strengthens the muscles of the calf. This, in turn, makes your walks, runs, climbs and jumps easier.
The heel drop exercise, on the other hand (or foot), stimulates bone rather than muscle.
When you do the heel drop, you do not slow down the descent of the heel — you simply drop on your heels.
This impact creates ground reaction forces (that travel up through your skeleton) similar to those created when you walk briskly, run or jump.
Conclusion
This heel raise exercise post introduced the reasons why you need to increase muscle strength in your calf area and demonstrated the basic heel raise exercise. We also covered a progression of the heel raise exercises so that you can further increase the strength in the calf muscles.
Osteoporosis Exercise Plan
Visit my Osteoporosis Exercise Plan page for more information on this topic.
Comments
April 26, 2022 at 12:09pm
Sadie
I was wondering if it is safe to wear a weighted vest with some spinal osteopenia (T score-1.9) and if so what weight.
Thanks.
April 26, 2022 at 12:34pm
Thérèse
Many thanks for this clear explanation how to progress gradually and safely to the single-leg version. Two questions: First, where is the playlist with the stretches? Second, after a bad ankle sprain, a physical therapist had me do heel raises and come down to a slow count of five, so your pace surprised me. Is it harmful or pointless or OK for me to continue with my slower pace now that the ankle injury is history (20+ years ago, though the damnèd thing still hurts some days)?
April 27, 2022 at 6:52pm
Jackie Novak
Can one use ankle weights when doing the heel raises?
April 29, 2022 at 3:52pm
Penny
I value exercises for osteoporosis but I also have arthritis on my knees and spine. Are these exercises helpful for my arthritis or do I have to use caution?