Table of Contents
The forward bend position occurs when people do certain exercises, Yoga and Pilates poses, and day-to-day movements. When done incorrectly, they can cause flexion of the spin. This can be problematic. But this forward flexion does not have to happen — if you learn to move correctly. The hip hinge is a great foundation for many of the movements you use during exercise and daily activities. I encourage many of my clients to learn and practice the hip hinge.
In today’s blog post I will provide a detailed step-by-step instructions on how to do the hip hinge exercise. I cover why you should practice this exercise and show you where you can use it in your activities of daily living, your exercise program, and your yoga or Pilates practice. As a bonus, I offer a few tips on how to know you are flexing your spine when doing a forward bend. Let’s get started!
Benefits of Learning the Hip Hinge Exercise
The hip hinge exercise has many benefits. Here are several that come to mind:
- Increase your body awareness and mindfulness not only within your Yoga, Pilates and exercise program but also in your day-to-day movements.
- Improve your postural alignment and increase your strength in your core and back. This will increase your strength not only into your core exercise program but improve your balance and prevent falls.
- Teach you how to improve your posture and reduce the risk of compression fractures caused by habitual forward flexion.
How to Do the Hip Hinge Exercise
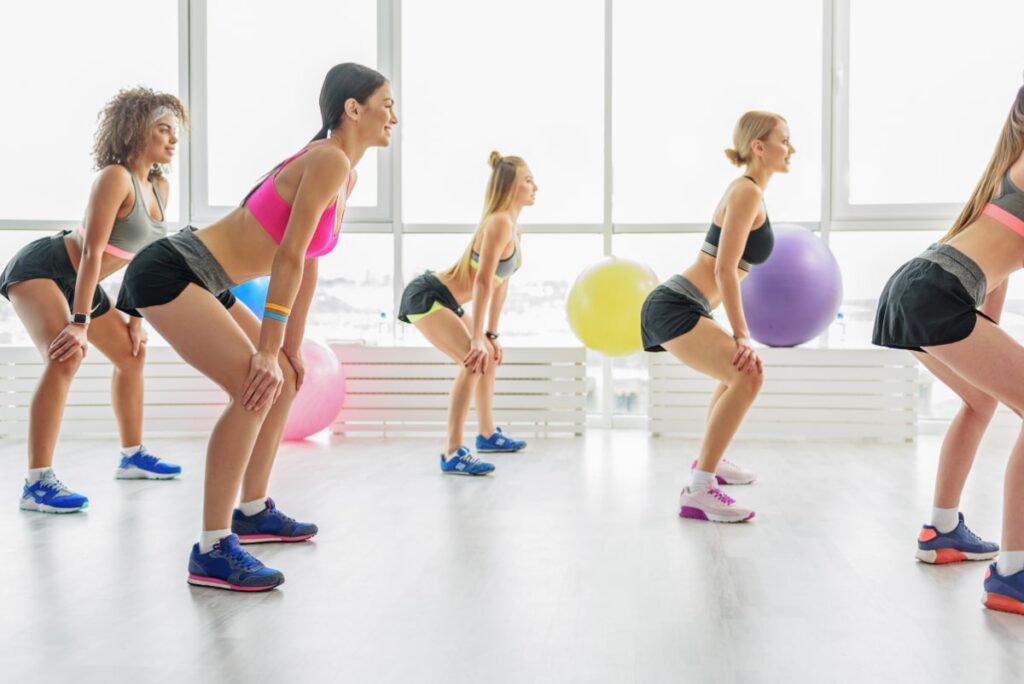
The hip hinge exercise warm up exercise from the Exercise for Better Bone program. It is one of several warm up exercises you should do before starting the strength exercise component of the Exercise for Better Bones.
The following are the instructions for the hip hinge exercise.
I call it the Bird Nod because it reminds of those little red birds when I grew up that would nod back and forth and that’s essentially what you’re going to be doing. It’s a great warm up for your hamstrings and for balance.
- With your hands centered you’re going to bend the supporting knee slightly.
- Bend your supporting knee as you start to lift the unsupported leg.
- For every degree that you’re lifting the leg, let your torso drop so that eventually you come into a horizontal position and back.
- If you only have the stability to go to 45 degrees, go to 45 degrees until you build that stability.
- Keep your pelvis level.
- Visualize a ruler across your buttocks.
- Keep that ruler nice and level as you come down. You don’t want this coming across.
- Let’s look at this on the other side.
- Take your breath.
- For every degree that you lift your leg, your torso drops like a teeter totter, and back.
That’s it for the hip hinge exercise.
Hip Hinge Exercise • Professional Tip
The following are tips for health and fitness professionals for the hip hinge exercise.
Often what will happen is with your client, they don’t have an association of where their torso is for keeping it straight, so they will either drive their leg up far more than they’re dropping their torso, or vice versa, they’ll have their torso dropped before their leg comes up.
One of the ways that I encourage them to visualize that is working with the mirror to their side, is having them think about that unity between the shoulder, the hip, and the knee.
And so as they’re moving, and having them start even just with 10, 15, 20 degrees at a time, so that they’re getting this concept, this moving as a solid unit with the trunk hinging around the hip joint for the Bird Nod.
So I hope that helps you with your clients.
Standing Forward Bend
Movements, exercises and Yoga poses that involve the standing forward bend can (and should) be done without flexion of the spine. This requires that you do two things:
- Bend from your hips, knees and ankles.
- Actively use your postural muscles to resist gravity and keep your spine elongated.
Forward bending is a very common way to “loosen up those hamstrings” in an exercise class. But we also bend forward quite frequently to pick things up and set things down. Unfortunately, most people are bending forward with the head and shoulders forward and the spine rounded. When we bend in this way, we are improperly stretching the hamstrings and causing damage to our spine.
magnis consectetur porta ut. Fringilla egestas at facilisis tristique malesuada consequat at donec habitant. Nec nulla purus enim vitae diam porta id.
How to Prevent an Unsafe Standing Forward Bend
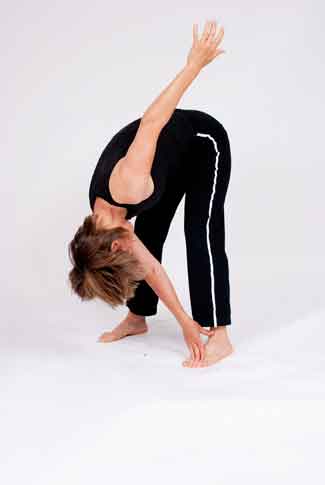
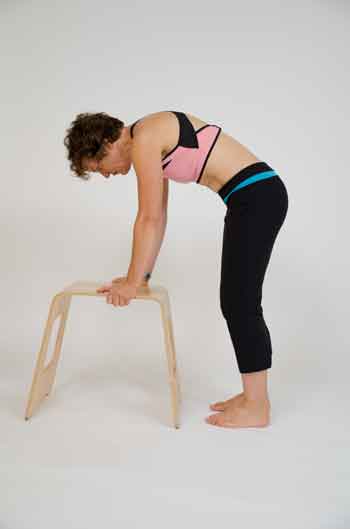
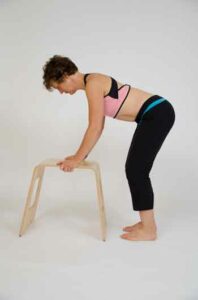
In the photo you can see our model, Pat, warming up for her exercise program by touching her toes. She goes into a forward bend that is safe because she is bending from her spine.
Unfortunately, Pat might not even be aware that she is doing this movement. Are there cues that Pat can try to indicate that she is putting herself in forward flexion?
Yes, she can. Here are two I recommend to my clients.
Tips to Check if You Are in Flexion When You Forward Bend
Here are the details of the first tip:
- Place one finger on your belly button and another finger at the base of your sternum at the xiphoid process.
- Start to bend forward.
- As soon as your fingers start to come towards one another that means that you’re flexing somewhere in your spine.
- This is your stopping point in order to protect the spine.
- If you want to do those toe touches or forward bends, this is as far as you go.
I often have my yoga students do this exact thing in their sun salutations. If we want to go further forward we really need to keep this nice length through the spine.
Here is a second tip that I really like to use (but never do in a public class):
- Pinch the skin just above your waist on your back.
- While pinching that skin and folding forward, if I go too far and cause my back to bend I’m going to feel that pinch right away.
- However, if I keep my butt out and my back flat that pinch should not change at all because I’m not rounding from my spine. I’m simply hinging from my hips, bending from my knees and keeping my spine safe.
Exercises to Avoid if You Have Osteoporosis
I have a detailed blog post on exercises you should avoid if you have osteoporosis (including the one above!).
Forward Bend Movements and the Hamstring Stretch Exercise
If you have tight (or short) hamstring muscles, you will need to bend from the hip and knees until your hamstrings are more flexible. Safe hamstring stretches are highly recommended. I have a detailed blog post on safe hamstring stretches that you can follow.
Exercise Recommendations for Osteoporosis
Exercise is an essential ingredient to bone health. If you have osteoporosis, therapeutic exercise needs to be part of your osteoporosis treatment program.
But what exercises should you do and which ones should you avoid? What exercises build bone and which ones reduce your chance of a fracture? Is Yoga good for your bones? Who should you trust when it comes to exercises for osteoporosis?
A great resource on exercise and osteoporosis is my free, seven day email course called Exercise Recommendations for Osteoporosis. After you provide your email address, you will receive seven consecutive online educational videos on bone health — one lesson each day. You can look at the videos at anytime and as often as you like.

I cover important topics related to osteoporosis exercise including:
- Can exercise reverse osteoporosis?
- Stop the stoop — how to avoid kyphosis and rounded shoulders.
- Key components of an osteoporosis exercise program.
- Key principles of bone building.
- Exercises you should avoid if you have osteoporosis.
- Yoga and osteoporosis — should you practice yoga if you have osteoporosis?
- Core strength and osteoporosis — why is core strength important if you have osteoporosis?
Enter your email address and I will start you on this free course. I do not SPAM or share your email address (or any information) with third parties. You can unsubscribe from my mail list at any time.
Forward Bend, Yoga and Hip Hinge
There are a number of Yoga poses that involve a forward bend. We will cover two here in this discussion. Let’s start with the Uttanasana. Here Jan is doing an unsafe Forward Bend Yoga pose.
Unsafe Forward Bend Yoga
Uttanasana • Standing Forward Bend Pose
The Uttanasana, or Standing Forward Bend Pose in Yoga, requires modification for most students of Yoga.
- In order to maintain spinal elongation, especially in the thoracic area, bring your should blades together.
- Your spine should not flex forward to the point where the rib cage makes contact with the thighs.
- The Standing Forward Bend Yoga Pose requires a deep bend of the hips. If you have tight hamstrings, you will also need to bend deeply at the knees. (I encourage you to practice my hamstring stretch exercise.)
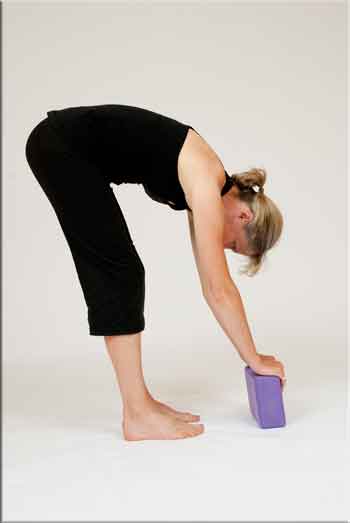
Props also help but should not be treated as a replacement for engaging the postural muscles. Here is Jan doing the Forward Bend Yoga pose but this time with good alignment.
Safe Forward Bend Yoga
Sun Salutation • Surya Namaskar
The Surya Namaskar, commonly known as the Sun Salutation, involves a sequence of poses, many of which incorporate the forward bend. Like the Standing Forward Bend Pose, you need to be mindful of where you are bending when transitioning between poses.
You should not flex from the spine, and instead use a combination of the hips, knees and ankles to transition safely from pose to pose. I encourage you to learn how to do a proper hip hinge and increase the flexibility of your hamstrings. Both will improve you Sun Salutation!
If you want to learn more about how to safely practice Yoga if you have osteoporosis, osteopenia or low bone density, I encourage you to check my book Yoga for Better Bones. It describes with pictures and text what poses you need to modify and which you should probably avoid.
Forward Bend, Core Strengthening and Hip Hinge
The plank and side planks, in my book Strengthen Your Core, are excellent core strengthening exercises. However, you want to do this with good form, which means you do not want to flex your spine when you forward bend. In the video, below, I describe how to forward bend from the hips and not the spine, when getting into a plank position.
As the video illustrates, when you forward bend, you should do it from the hips and not the spine.
Before you go into your plank position, you want to make sure that your posture is properly aligned. There are two cues you can use to make sure that things are well aligned.
Establish the Natural Distance Between Your Sternum and Bellybutton
- Flexed posture: You’ll notice that the space between our sternum and the bellybutton comes closer together.
- Extended posture: The space between our sternum and the bellybutton is wide apart.
- Neutral spine position: The distance between the two is neither too close or too far.
Make Sure Your Shoulder Blades are Not Too Far Apart or Too Close
When you are in a flex position, the shoulder blades come forward and come away from the spine. Even if you try to have a neutral posture but your shoulder blades are forward, it will be counterproductive for you. This is especially true when you get into a position where you’re supporting your weight on your hands.
A similar problem occurs in extension, with the shoulder blades too tucked.
How to Enter the Plank Position
Enter in with movement from the hip.
Flex from the hip and not from the spine. If you enter it with flexion of the spine, then you have to undo things before you even get into your plank position. You will have to undo the position of the shoulder blades, the position of my neck, and the roundness of the spine.
As you get into position for your plank and side plank you should do so by doing a forward bend from your hips rather than bending at the spine. This will allow you to set your position before you increase the challenge on your shoulders, hips and abdominals.
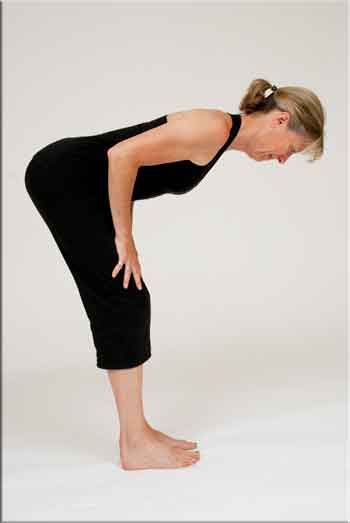
Unsafe Forward Bend
Forward Bend, Strength Exercises and Hip Hinge
The hip hinge allows you to maintain a proper forward bend when doing many exercises, including strength exercises. A good example is the Bent Over Row Exercise, found in the Exercise for Better Bones program.
The Bent Over Row Exercise benefits the muscles of the upper back, buttock and hamstrings. It is also beneficial for the bones in the hips, spine and wrists. In the video above, I demonstrate how to do this exercise and maintain the forward bend with good form. Note how I incorporate many of the movements from the hip hinge exercise.
Exercise Recommendations for Osteoporosis
Exercise is an essential ingredient to bone health. If you have osteoporosis, therapeutic exercise needs to be part of your osteoporosis treatment program.
But what exercises should you do and which ones should you avoid? What exercises build bone and which ones reduce your chance of a fracture? Is Yoga good for your bones? Who should you trust when it comes to exercises for osteoporosis?
A great resource on exercise and osteoporosis is my free, seven day email course called Exercise Recommendations for Osteoporosis. After you provide your email address, you will receive seven consecutive online educational videos on bone health — one lesson each day. You can look at the videos at anytime and as often as you like.
I cover important topics related to osteoporosis exercise including:
- Can exercise reverse osteoporosis?
- Stop the stoop — how to avoid kyphosis and rounded shoulders.
- Key components of an osteoporosis exercise program.
- Key principles of bone building.
- Exercises you should avoid if you have osteoporosis.
- Yoga and osteoporosis — should you practice yoga if you have osteoporosis?
- Core strength and osteoporosis — why is core strength important if you have osteoporosis?
Enter your email address and I will start you on this free course. I do not SPAM or share your email address (or any information) with third parties. You can unsubscribe from my mail list at any time.
Golfers Lift
A number of our activities of daily living involve a forward bend and as we lift an object off of the ground. Reaching down to lift or pick up an object with a forward bend from the spine puts significant pressure on the lumbar and thoracic spines. Repeated movements like this can lead to disc problems. If you have osteoporosis, these movements can cause compression fractures.
How Tight Hamstrings Can Restrict Your Forward Bend
If I try to pick something up off of the floor, I will bend at my hips with straight legs until my hamstrings say “that’s it, I can’t give you any more range.” The hamstrings are attached to the pelvis and their job is to allow this bending—or hinging—within an allowable range of motion. For me, that range of motion is a little under 90 degrees. For you, that range may be more or less.
Once I get to the “that’s it” point in my hamstrings, my option is to bend from the knees by increasing the distance between my feet and then going down into a deeper squat. In this position I can pick something up safely by using my knees and hips, while keeping that little arch in my back. However, this movement is possible for me because my hamstrings are just moderately tight. I can get there, but just barely.
If your hamstrings are tighter, bending just the knees and hips may not be enough to facilitate picking something up. So how do we get there? Typically, the rest of the bend ends up coming from your spine due to the limitations of the hamstrings. This type of bending in the spine should be avoided for multiple reasons, especially those related to osteoporosis.
Golfers Lift Technique
Like the exercises and poses described above, you need to be careful not to bend from the spine and instead bend from the hips. This is accomplished with either a hip hinge or a technique called the Golfers Lift.
The Golfers Lift is a safe way to bend over and retrieve an item without compromising your posture. In the video above I demonstrate this technique.
It is called the Golfers Lift because you sometimes see golfers use it as they retrieve their golf ball off the grass. Instead of movement coming from the spine, the movement comes from the hip. This is much safer for your spine! Your bones, your spine and your body will be much happier.
Hip Hinge Exercise Alternatives
Here is a video I did several years ago on how to bend forward safely using the mechanics of the hip hinge exercise.
Osteoporosis Exercise Plan
Visit my Osteoporosis Exercise Plan page for more information on this topic.
Comments