Table of Contents
Flexible hamstrings help keep spines safe and strong. They allow you to hinge from your hips and bend forward without flexing your spine. In today’s post I demonstrate how to stretch hamstrings and make them more flexible.
How to Stretch Hamstrings
- Discuss hamstring anatomy.
- Show you how to test hamstring flexibility or tightness and determine the right hamstring stretch for you.
- Demonstrate how to stretch hamstrings with four variations of a lying hamstring stretch.
- Identify whether you should do calf stretches before you try to increase your hamstring flexibility. If your calf muscles are tight it is important that you first take time to stretch your calf otherwise it will limit your ability to fully stretch your hamstrings.
Benefits of Flexible Hamstrings
There are many benefits of flexible hamstrings. Here are three benefits that immediately come to mind:
- Perfect posture.
- Reduced risk of compression fracture.
- Avoidance of injury.
Flexible Hamstrings Improve Your Posture
Hamstring flexibility and tightness can affect your posture in a detrimental way. In his book, Low Back Disorders — Evidence-Based Prevention and Rehabilitation, Dr. Stuart McGill states “Lower extremity capability is needed to facilitate spine-sparing postures when lifting and when performing a host of other tasks.” (1)
Lower extremity capacity encompasses the strength and flexibility of the lower extremities, meaning your legs. When it comes to your back and how you move, your hamstrings play a big role. They allow you to do a range of activities and not compromise your posture. The hamstring flexibility exercises I recommend in this blog are designed to achieve that goal.
Flexible Hamstrings Reduce Your Risk of Compression Fracture
Tight hamstrings are especially problematic for people with osteoporosis. When hamstrings are not flexible, they pull the pelvis in a downward direction. The downward pull causes a posterior tilting of the pelvis which, in turns, causes our lower back to lose its natural inward arch.
The loss of the arch leads to the rounding of the mid back. Along with weak core muscles, tight hamstrings predisposes us to bend from our the spine rather than through the knees and hips. When we bend from our spine it creates an increased “kyphosis” or hump back.
Why is this a concern for individuals with osteoporosis? Because this rounded back posture, or kyphosis, puts a lot of pressure at the front of the vertebrae, as well as our discs.
When you have low bone density in your spine, repeated forward bending at the spine creates micro-trauma to the vertebrae. Over time, these repeated micro-traumas can evolve into a more serious trauma. Eventually, a minor movement — like reaching into a fridge or even coughing — can cause a compression fracture. In reality, that small, everyday movement was “the straw that broke the camel’s back”.
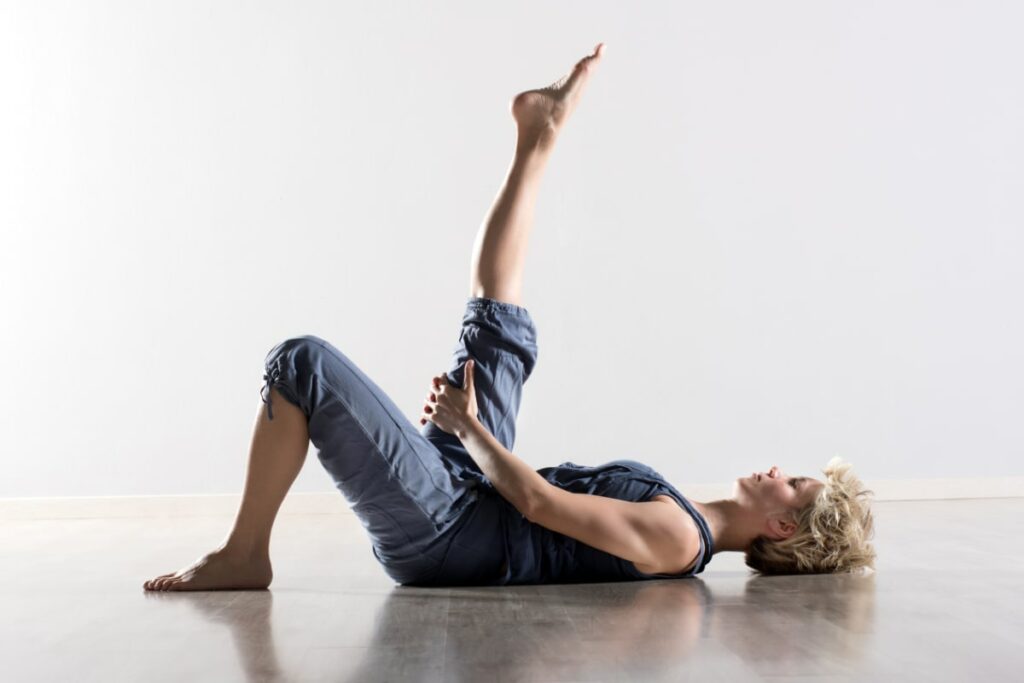
In the photo, below, a young woman performs a pose and demonstrates her hamstring flexibility. The concern is the alignment of her spine.
For a more detailed understanding of how flexion of the spine can cause minute trauma to the vertebra which accumulates to finally cause a compression I encourage you to revisit the blog article titled Osteoporosis Posture Explained.
Flexible Hamstrings Make Your Exercises and Yoga Practice Safer
Flexible hamstrings will help you perform many Yoga poses without compromising your posture. I discuss this in detail in this blog post on Standing Forward Bends.
Flexible Hamstrings Help You Avoid Injury
How do we avoid these potential injuries? By increasing the flexibility our hamstrings via simple, safe hamstring stretches like the ones demonstrated in this article.
In 2015 an international consensus by leading researchers on physical activity and exercise for adults with osteoporosis (2) recommended that prescribed exercise, for individuals with or without vertebral fractures, encourages safe movement patterns.
The hamstring stretches demonstrated in this blog are, onto themselves, safe movement patterns and prescribed exercises, as defined by the research team. But, even more importantly, they provide you the flexibility you need so you can incorporate safe functional moves into your day-to-day life.
Let’s quickly cover hamstring anatomy and the key functions of the hamstring muscles. If you are already familiar with these topics, I suggest you jump to the Hamstring Flexibility Test.
Hamstring Anatomy
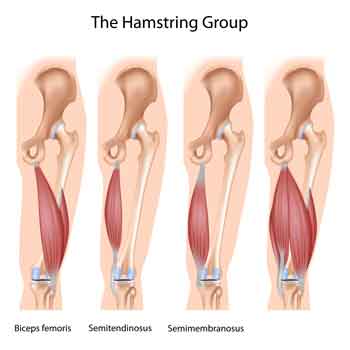
The hamstring connects our pelvis and femur to our lower legs. The hamstring muscle is actually composed of three muscles that make up the back of our thighs:
- Biceps femoris
- Semimembranosis
- Semitendinosis
The image, above, shows the back of the right leg and illustrates each of the three muscles that make up the hamstring.
On the outer posterior thigh lies biceps femoris (like the bicep muscle in our arms this muscle has two heads, hence the name biceps), semimembranosis and semitendinosis cover the inner posterior of the thigh.
Biceps femoris’ long head attaches from the outside of the our sit bone, while the short head originates from the lower half of the shaft of the femur. Together they connect down below the knee to the head of the fibula (the tall slim bone on the outside of the lower leg).
Semimembranosis and semitendinosis attach from the inside of the sit bone at the pelvis and connect down to the tibia both on the back and wrapping around to the front of the tibia (the large lower leg bone that we often refer to as our shin bone).
Functions of the Hamstring Muscles
Hamstrings have several important functions. First, one key hamstring function is the ability of the muscles to pull the pelvis into a posterior pelvic tilt. This is a common cause of low back pain and poor posture when forward bending. Tight hamstrings will limit the ability of your pelvis to tilt forward as you start to bend from your hips. The pulling into a posterior pelvic tilt will flatten your natural arch of your lower back and cause a rounding of your spine.
Second, the hamstring group also bends the knee, extends the hip, and helps in rotating the thigh inward and outward.
Third, strong, flexible hamstrings are important to ensure you can enjoy the sports and activities you love such as brisk walking, running, cross country skiing, and other common activities.
Before I demonstrate how to stretch hamstrings, I will walk you through a hamstring flexibility test so you can determine how flexible your hamstrings are. Let’s start by finding out how tight your hamstrings are.
I encourage all my clients to aim for 90 degrees of flexibility. Remember you did not get tight overnight and it may take a few weeks to become more flexible.
Hamstring Flexibility or Tightness Test
In this section I will cover how to do a self test to determine hamstring flexibility or tightness, whether you should initially increase calf flexibility, and what hamstring flexibility exercise is best for you.
Let’s get started with the test. When you play video below, it will go directly to the part that describes the hamstring flexibility test.
Hamstring Flexibility or Tightness Test
This hamstring flexibility test will help you determine your level of hamstring tightness. These are the step by step instructions:
- Lie flat on the mat and bend your left knee, sole of the foot to the mat. This is not critical for stretching your hamstrings, but it is important in order to keep your back safe.
- If you have any back pain or you’ve had a herniated disc, I suggest you also put a little rolled towel in the small of your back.
- Lift the right leg toward the sky and keep your leg straight. You’re going to feel muscle tightness in the thigh, as the quadricep muscles lift your leg along with your hip flexors.
- Continue to lift the right leg until you feel your back flattening to the mat, or push into the rolled towel you may be using. You can check this by simply feeling with your hand if that little arch in your back that you started with is gone.
- Once you reach the point where the back is flattening, that is the limit of your hamstring flexibility.
- Lower the leg slowly.
- Switch and repeat on your other side with the right knee bent, lifting the left leg.
What to Measure in the Hamstring Flexibility/Tightness Test
When performing the hamstring tightness test, I measure the approximate angle by straightening my bottom leg. This angle is referred to as the straight leg test and it is a measure of hamstring flexibility.
- As shown in the video demonstration, with the non-testing leg straight, I have about 80 degrees of hamstring flexibility. Ideally, I wish all my clients to have 90 degrees of hamstring flexibility as this will allow them to bend over more easily, hinging from their hips rather than rounding their spine.
- When testing your hamstring flexibility you may feel tightness behind or below the knee. If so, I recommend you stretch your calf muscles first.
- The hamstring and the calf muscles cross one another behind the knee, so tightness in the calf muscle will limit your ability to get a full stretch of your hamstring.
Four States of Hamstring Flexibility
Hamstring flexibility can vary from individual to individual. Generally, I find people fall into one of four states of hamstring flexibility. These are based on my clinical observations.
- Very tight. You feel tightness before your leg reaches 45 degrees from the floor. Do the stretch using a ball.
- Moderately tight. You feel tightness between 46 and 80 degrees. Do the stretch using the wall.
- A little bit tight. You feel tightness between 81 and 90 degrees. Do the stretch using a rope or belt.
- Not tight. You are able to lift your leg past 90 degrees. The rope or the wall versions will work for you.
The next exercise will stretch that tight calf muscle so we can progress to the hamstring stretches.
Exercise Recommendations for Osteoporosis
Exercise is an essential ingredient to bone health. If you have osteoporosis, therapeutic exercise needs to be part of your osteoporosis treatment program.
But what exercises should you do and which ones should you avoid? What exercises build bone and which ones reduce your chance of a fracture? Is Yoga good for your bones? Who should you trust when it comes to exercises for osteoporosis?
A great resource on exercise and osteoporosis is my free, seven day email course called Exercise Recommendations for Osteoporosis. After you provide your email address, you will receive seven consecutive online educational videos on bone health — one lesson each day. You can look at the videos at anytime and as often as you like.

I cover important topics related to osteoporosis exercise including:
- Can exercise reverse osteoporosis?
- Stop the stoop — how to avoid kyphosis and rounded shoulders.
- Key components of an osteoporosis exercise program.
- Key principles of bone building.
- Exercises you should avoid if you have osteoporosis.
- Yoga and osteoporosis — should you practice yoga if you have osteoporosis?
- Core strength and osteoporosis — why is core strength important if you have osteoporosis?
Enter your email address and I will start you on this free course. I do not SPAM or share your email address (or any information) with third parties. You can unsubscribe from my mail list at any time.
Tight Calf Muscle Stretch
How do you stretch tight calf muscles? I have advanced the video below to the demonstration of this stretch.
For some people, repetitions of flexing the foot and pulling their toes up towards their nose and then releasing is efficient. It’s a wonderful thing to do first thing in the morning!
If this calf stretch is at all uncomfortable for your knee, you can place a pillow under the leg and knee, low enough so your heel is hanging just over the pillow. This supports the knee, as some of us hyperextend in this area.
When doing this stretch, simply point and flex the foot for as many repetitions as comfortable. The pointing is not as important for the flexibility of the calf, but it’s a lovely way of keeping the front of the ankle flexible as well.
Calf Muscle Stretch with a Belt, Strap or Rope
- If the stretch starts to feel less significant, I suggest that you loop a soft belt, strap or rope around your foot to get a deeper stretch.
- Please note, you can do this stretch with or without a shoe. Some find a shoe more comfortable as it keeps the prop in place and you’ll feel less pressure on your foot.
- Be sure to have the belt, strap or rope at the ball of the foot rather than the arch. At the ball mound you’re able to get a more active, deeper stretch.
- Keep your elbows by your side, shoulder blades tucked and stay long through the back of your neck.
- Begin pointing and flexing the foot, and keep the leg down still resting on the floor or pillow.
- Keep your breath comfortable and relaxed. Exhale through the stretch.
- The muscles of your feet to do 90% of the work, so the foot is pulling the toes towards the nose rather than the rope. Only that last little pound or two of pressure is lifted by the rope.
Lorem Ipsum Dolor Sit Amet Purus
This is what we refer to as active isolated stretching. By actively contracting the muscles in the front of your lower leg, you’re relaxing the muscles on the backside — your calf muscles. A wonderful way to get more flexibility in the calf!
It may take about 30-40 repetitions to get them loosened up, or two weeks of 30-40 repetitions per day. Either way, keep up this stretch until you feel you’ve loosened up the calf muscle.
How to Choose a Hamstring Stretch Exercise
Once you identify your hamstring flexibility, you can select the hamstring stretch exercise that is best for you. Over time, you can progress onto more challenging exercises as your flexibility increases. These hamstring stretches are:
- Easy to do.
- Safe for your spine.
- Address different levels of hamstring tightness.
- Progressively increase the range of your muscles.
- A key element in being able to move with safe body mechanics.
Supine Hamstring Stretch with Stability Ball
This hamstring stretch is done on your back using a stability ball.
- Lie on your back, with both knees bent.
- Place one foot onto the front of the ball.
- Straighten the leg that is resting on the ball until you feel a gentle stretch in the hamstring.
- Inhale as you roll the ball toward you, the knee towards your chest.
- Exhale as you roll the ball away, straightening your knee.
- As your flexibility is improves, explore bringing the ball a bit closer to your buttocks. As you straighten, the leg will be higher providing more of a stretch.
- Endeavour to straighten the knee completely each time you roll the ball away.
Supine Hamstring Stretch in Doorway
If your hamstrings are moderately tight and the ball does not provide a stretch, I recommend you do the supine hamstring stretch lying on the floor using a doorway/doorframe.
- Start by turning sideways to the wall, butt sideways with your shins perpendicular to the wall.
- The distance that you are from the doorway will change the depth of your stretch. I recommend starting about six to eight inches from the wall.
- As your flexibility increases you will be able to straighten the opposite leg through the doorway. You may explore wearing socks to help your foot slide up the doorframe.
How to Do the Supine Hamstring Stretch in Doorway
- Softly inhale at rest.
- Exhale as you slowly slide the foot up the wall.
- The stretch should be felt in the back of your upper leg.
- Inhale as you slowly lower the leg back down.
- Keep repeating these movements, exhaling up and inhaling down.
- Keep your shoulders tucked back, and your neck long.
- A small rolled towel in just above your pelvis will help remind you to keep the arch of your spine neutral.
- When you slide up, if you feel your back flattening into the towel, that’s your cue that you’ve found the limit of your hamstring.
- Your goal is to be able to stretch without flattening your spine.
Use the head support that you need maintain a neutral head and neck posture.
Deepen the Supine Hamstring Stretch
After doing around 20 or 30 repetitions, you may feel that you’re getting more flexible. To deepen the stretch you have two options:
- Get closer to the wall or,
- Straighten the non-stretched leg.
If straightening the opposite leg does not increase your stretch explore getting the buttocks all the way to the wall.
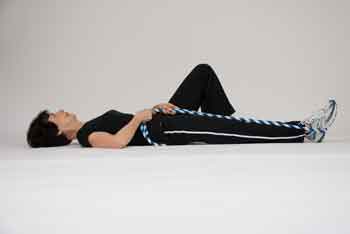
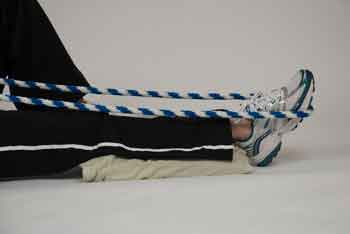
Lower Hamstring Stretch with Rope
This stretch is great option for those who are a little tight in their hamstrings or if they want to maintain their flexibility. Do this hamstring stretch lying down on your back and you will need a 3/4 inch rope or Yoga belt.
- Lie on your back just as we did with the calf stretch. One knee is bent, sole of the foot to the mat.
- Place the rope around the arch of the opposite foot. Use the rope to help you lift the leg, toes of the foot toward the sky.
- Once the leg is lifted, slowly and rhythmically move in and out of bending and re-extending the leg.
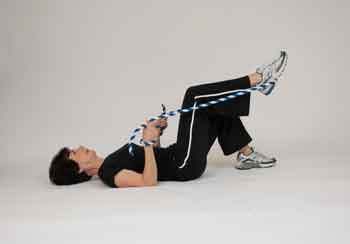
Depending on your flexibility, the leg may lift all the way to 90 degrees, or lower. If the leg is lower than 90 degrees, you may need to recruit more help from the rope. Below, I’ll give more options for those of you that are tighter.
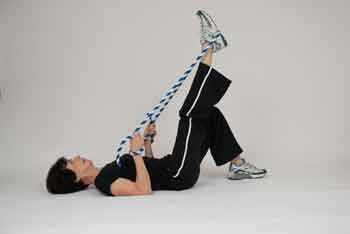
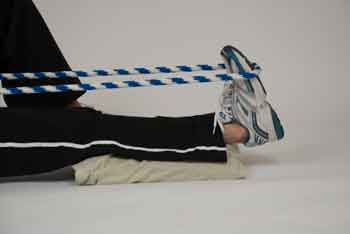
Upper Hamstring Stretch with Rope
The upper hamstring stretch targets the part of the hamstring that is closer to the sit bone, or the ischial tuberosity. We will perform the same setup as before.
- Lie on your back, bend one knee with the sole of the foot to the mat.
- Take the rope on the opposite ball mound and once more.
- Use the rope to lift the leg, foot toward the sky. The difference here is that we will now lift and lower the leg, but keep the knee straight for the entire stretch.
- Use your breath here.
- Inhale as you lower, exhale as you lift.
- Be sure to keep the elbows by your side. Shoulders are tucked. Hold both ends of the rope in one hand.
- Explore which hand feels best.
- Make sure you keep your knee nice and straight.

Active Isolated Stretching Versus Static Stretching
All of the stretches I’ve explained so far are called Active Isolated Stretches. The founder of Active Isolated Stretches is Aaron Maates. (3)
With Active Isolated Stretching each stretch is held for one to two seconds and repeated at least 10 times. Active Isolated Stretching is very dynamic and therefore can be used as a warm up to exercise, yard work, house work or sports.
Static Stretch
After you’ve completed those active isolated stretches, whether it was using the ball or extending your leg up against the wall, you can turn your dynamic stretch into a static stretch. A static stretch is as the name implies — there is no movement. The intensity of the stretch should allow you to relax in that position.
While relaxing, you are looking for an intensity of about 4 to 5 out of 10. This lower level of intensity allows your muscles and your fascia to release and relax.
If you enter a static stretch with too much intensity, your body is just going to fight it. Make sure you’re in a position to where you are stretching but are also comfortable, similar to what you may see in a Yin yoga class. It should feel like a delicious stretch.
If you are stretching with the support of the doorway you may choose to slide the opposite leg down if you haven’t already. You can get a little closer to the wall, or for individuals that are very flexible you might even place a bolster behind the leg to deepen the lengthening of the hamstring. You can also extend your arms out to the side to open your chest lengthening through the back of your head and neck, as bonus stretches.
To exit the stretch, slowly bend one knee at a time bring your knees towards your chest. With your knees together roll onto your side. Pause for a few breaths before pushing yourself up.
Stretch Goals
All of these stretches and tips will allow you to reach your goals of:
- Moving with better body mechanics.
- Keeping your spine protected and strong.
- Improving and/or maintaining flexible hamstrings.
References for How to Stretch Hamstrings
- McGill, Stuart. Low back Disorders, Evidence-based Prevention and Rehabilitation. p. 240.
- Giangregorio, L.M., et al, Too Fit To Fracture. Outcomes of a Delphi consensus process on physical activity and exercise recommendations for adults with osteoporosis with or without vertebral fractures. Osteoporosis International, 2015 Mar; 26(3): 891-910
- Mattes, Aaron. Active Isolated Stretching: The Mattes Method. Privately published.
Osteoporosis Exercise Plan
Visit my Osteoporosis Exercise Plan page for more information on this topic.
Comments
May 28, 2019 at 3:31pm
Chris
Hi Margaret! Excellent article and video as usual! I'm a retired PTA in NY. and have been subscribed for a few years. I love your books and MelioGuide, avidly looking forward to each new post. Your osteoporosis guide is my favorite, but really all the guides are brilliant! Many thanks for posting the latest information and expert instruction on so many topics for healthy aging. Kudos to you and keep up the great work!
May 28, 2019 at 10:11pm
Margaret Martin replies
Hi Chris, Once a PTA always a PTA! Glad my books and blogs meet your standards.:) I really appreciate you taking the time to share a little about your story and your positive opinion of our work. I say "our" because without my husbands strong writing and video skills the books and blogs would not exist. Glad they are helpful. It motivates us to keep sharing. Wishing you many more active years.
Margaret
May 29, 2019 at 10:06am
Marianne
Ideally you always want to have that little arch in the spine as the leg goes up...whether naturally or with a rolled towel?
May 29, 2019 at 3:44pm
Susan Skoda
Great exercises, I learned so much about proper stretching. Maintaining the arch in the spine, supporting arthritic knees, head support, counting with breaths and the degree of stretching. Using the wall is another great way to achieve this. Thanks so much!
May 30, 2019 at 3:41pm
Richard Martin replies
Hi Susan. Glad you find the information useful.
June 1, 2019 at 5:18pm
Serena
Can you tell me a little more about keeping the arch in the spine? How large of a rolled towel would be used (what would be the diameter of the rolled up part)? thanks for your wonderful explanations and videos.