Table of Contents
In this blog, I present three different variations of the physical therapy bridge exercise.
Physical Therapy Bridge Exercise Variations
The three physical therapy bridge exercise variations are:
- Bridge Exercise for Beginner
- Bridge with Weight Exercise
- Bridge Exercise with 2 Up and 1 Down
Let’s start with the Bridge Exercise for Beginner.
Bridge Exercise for Beginner
The bridge exercise is one of the Beginner level Strength exercises in the Exercise for Better Bones program. It is the first of three variations of the physical therapy bridge exercise.
Bridge Exercise • Instructions
For the bridge exercise, have a rolled towel or a small pillow works well to use as your prop between your knees.
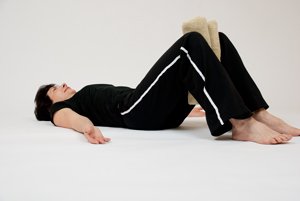
- Get down on your side and then roll onto your back.
- You want to have your feet hip width apart.
- Place the rolled towel between your knees.
- Arms are going to be away from your side. Meaning, not right in tight because that pulls your shoulders forward, rather away, with your shoulder blades touched down and back.
- If you need a towel or a pillow under your head, this you find out under the exercise safety tips for head positioning. You would use it at this time.
- In this position, start by taking your breath in, slowly, gently as you’re exhaling.
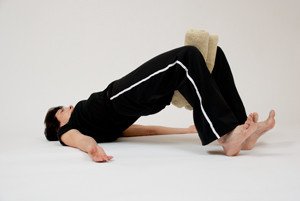
- Tighten your lower tummy, squeeze your buttocks, and lift your pelvis up towards the ceiling.
- As you come down, you want to draw your pelvis and your tailbone towards your heels.
- We are going to add one more step which is lifting your toes, lifting your feet and pressing your heels into the floor as you raise up.
- So let’s do that again.
- Breath in, and slowly, gently exhaling and tightening your lower tummy as you’re raising your feet and simultaneously lifting your hips, one, two.
- Draw your pelvis down towards your heels as you slowly drop your feet.
- Let’s do that again.
- Breath in, exhale, you want to transfer your weight onto your shoulder blades not onto your neck.
- Transfer onto your shoulder blades and lengthen your spine as you come back down.
- You’re holding this one for one to two seconds at the top of the hold.
- Breath in, heels, and lift high.
- Transfer the weight onto the shoulder blades, one, two.
- And draw back down.

Bridge Exercise • Next Step Instructions
Now, I want you to know how to take the ruler here, and at the top of my lift, you’ll notice that my body is in one straight line.
- You want to create that line between your shoulder, hip, and knee at the top of your hold.
- Don’t let your butt sag.
- Lift up high, squeezing your buttocks to get together.
- Transfer the weight onto the shoulder blades and back down.
- As you come back down don’t roll one vertebra at a time. I really want you to think about lengthening your body and reaching your tailbone down towards your heels as you come down.
That’s the beginner bridge.
Bridge with Weight Exercise
The Bridge with Weight on Pelvis is one of the osteoporosis back exercises in the MelioGuide Exercise for Better Bones Program. It is part of the Active Level Osteoporosis Exercise Program. It is the second of three variations of the physical therapy bridge exercise.
It can be performed safely when you follow proper instruction. You will need a few items to complete this exercise:
- A small pillow or rolled towel to put between your knees.
- A weight (such as a weighted belt) to place on your pelvis.
Make sure you go to the ground safely on your side and then roll onto your back before you start the exercise.
Follow the instructions below to properly and safely execute this exercise. I have also included a video demonstration of the exercise.
Purpose/Target:
- Muscles: Buttocks, Hamstrings, and Back.
- Bones: Hips and Spine.
Starting Position:
- Lie on back with feet flat on floor, feet and knees shoulder width apart, arms out from your sides, palms up.
- Hold a rolled towel between your legs.
- Place a sand bag weight (two to five pounds) on your pelvis.
- Inhale.
Movement:
Exhale as you:
- Squeeze your buttocks and push down through your heels.
- Transfer your weight onto your shoulder blades as you lift your hips towards the ceiling.
- Raise your toes as you raise your hips, lowering your toes as you lower your hips.
- As you come down lengthen your spine as though your tail-bone is reaching towards your heels.
- Return in a controlled manner to starting position & repeat movement until set is completed.
Tips:
- You should feel this in your buttocks, back of your thighs and muscles along your spine.
- Transfer your body weight to your heels and shoulder blades and not the back of your neck.
- Go high enough that you are bringing your hips into the line drawn between your hips and shoulders.

Bridge Exercise with 2 Up and 1 Down
The Bridge exercise for Athletic level (from the Exercise for Better Bones Program) targets the hips and spine. It also build strength in the hamstrings, buttocks and back. In the video I demonstrate how to do this exercise. It is the last variation of the physical therapy bridge exercise.
This is the Athletic Level Bridge. We’re going to go up with two and down with one.
- Place your arms away from your sides, palms up to encourage your shoulders and shoulder blades to come down into the floor.
- Your feet are going to be hip-width, or knee, and your knees are also going to be hip-width apart.
- Take your breath in.
- As you exhale, you’re going to lift, pressing through both heels.
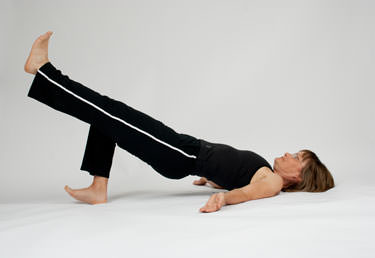
- At the top of the lift, you extend one leg and you come down on a single leg.
- You can alternate.
- What you’re looking for at the top of your lift is that your pelvis stays level.
- I’m going to place my hands on the pelvis just to demonstrate.
- As you come up, you want to keep your pelvis level, straightening your legs, and you don’t want to drop on the side.
You’ve got to really work your gluts and your back extensors hard to keep your pelvis level.
One more time. Once you know your pelvis is staying level, throw your arms back into this position and complete your set.

Exercise for Better Bones
Exercise for Better Bones is an exercise osteoporosis program designed for people like you. It is available for purchase at Amazon in printed book and Kindle formats. It provides a safe and effective means to strengthen bone, reduce fracture risk, and build confidence.
The Program has been successfully used by thousands of MelioGuide clients worldwide. And hundreds of Physical Therapists and Physiotherapists have prescribed the Program for their clients.
Osteoporosis Exercise Plan
Visit my Osteoporosis Exercise Plan page for more information on this topic.

Comments
March 7, 2017 at 2:43pm
Tsakraklidou A.
Beautiful exercise!relaxing while giving you a sense of balance.Thank you!
March 7, 2017 at 4:45pm
Margo
Why do you not want to try to roll down each vertebrae individually (if possible)? I recall that Pilates wanted the vertebrae individually. Is that bad for osteoporosis? Thanks.!
March 8, 2017 at 9:17pm
Margaret Martin replies
Hi Margo, Great question. The reason I do not encourage "rolling down" one vertebrae at a time is that the "rolling" action brings the spine into flexion - the same motion that occurs when you slouch or bend forward from your spine rather than hinging from your hips. The way I teach it keeps the spine in more extension and elongation.
April 8, 2019 at 10:33am
Marianne
Is there any contraindication for keeping the up position for an extended length of time? (Longer than 2 seconds indicated) I have found I can challenge myself more if I hold it longer.
April 15, 2019 at 10:20pm
Margaret Martin replies
Hi Marianne, Great question. You can certainly hold it longer - there is not a contraindication for doing so. However, the prime mover involved in raising the hips is Gluteus Maximus. Unlike the spinal extensors which are more static muscles and benefit from longer holds up to 10 seconds, the Gluteus Maximus are phasic muscles. They benefit more from increasing the load rather than the hold time. I encourage you to try the Active, Athletic or Elite level challenges.
Keep it strong!
Margaret