Table of Contents
I will demonstrate three different variations of balance ball exercises — each one progressively more challenging than the last. Are you ready?
Before we start, we should cover why you need a burst resistant exercise ball. Read my blog article Use a Burst Resistant Exercise Ball and then come back here.
This video covers some important safety tips and some basic moves before you start your balance ball exercises.
Balance Ball Exercises
The three balance ball exercises I will demonstrate are:
- Four Point Balance Ball Exercise
- Three Point Balance Ball Exercise with Arm Lift
- Three Point Balance Ball Exercise with Leg Lift
- Kneeling on Balance Ball
Let’s start with the Four Point Balance Ball Exercise.

1. Four Point Balance Ball Exercise
The Four Point Balance Ball is a balance exercise from the Exercise for Better Bones program specifically designed for the Athletic Level. This exercise should only be done with the correct sized and safe burst resistant physio or exercise ball.
We’re going into the four-point balance on the ball. It’s a lot of fun to do but it’s very important that we do it safely.
So what I’ve set up here is sort of a mock living room. I often encourage my clients to actually work alongside a sofa so you have a nice height here to stop you from rolling too far to one side.
Then you can take your sofa cushions off and put them along the other side. And you don’t have a chair right in front of you, you can actually just take a sofa cushion and put it forward.
As you’re balancing on the ball, you get the freedom of motion of the ball without the danger of toppling over. If you start rolling a little bit too far to the right or to the left, the cushions will stop you from rolling right over. You’ll butt up against them.
Make sure they’re high enough and firm enough and that will do the job.

1.1 Four Point Balance Ball • Directions
Now for the four-point, you just need a little bit of space of gives on either side so you have that freedom of motion on the ball.
- From the widest part of the ball, you’re probably looking at maybe one inch beyond that.
- In front of you, you need to place that cushion about one foot in front of you. Or have the chair approximately a foot in front of you.
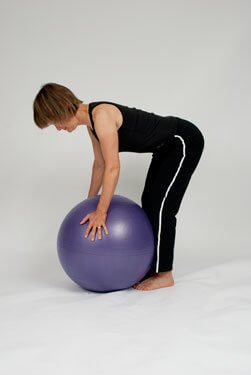
- Next, what you’re going to do is stand tall right behind the ball.
- In standing position you’re going to place the ball right up against your shins.
- Do not try to climb up on the ball. That’s sort of a big mistake people make.
- Just let the ball sit up against your shins.
- Your hands next are placed directly underneath your shoulders.
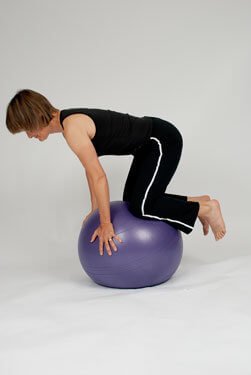
- From this position, this is where you take that little leap of faith. And you need to press off or push off from your toes. Your going to push off from your toes.
- In this position, you hands are directly still under your shoulders but they’re halfway down to the floor.
- You’re here, if you go a little bit too far, notice how that cushion’s going to stop me.
- Very stable, so it allows me that play. I don’t want it to be, initially, it can hold you a little bit, gives you that security. But eventually you want that inch of play all the way around.
- Take a step back and that’s your four-point balancing on the ball.

2. Three Point Balance Ball Exercise with Arm Lift
The Three Point Balance Ball Exercise is a balance exercise from the Exercise for Better Bones program. This exercise should only be done with the correct sized and safe burst resistant physio or exercise ball.
Athletic level balance, three-point balance ball exercise.
2.1 Balance Ball Exercise • Sofa or Bed Support
Your sofa is great for support.
You could also use the side of your bed and then use some big cushions in front and to your side. This way, you have a little bit of play with the ball but you’re safe the entire time.
On the other side, the pillows or your bed should be about an inch away from the furthest diameter of the ball, and you’ll need about a twelve inch play in front of you.
It somewhat depends on your ball size and your body size but you’ll soon realize how much space you need as you do the exercise.

2.2 Balance Ball Exercise • Directions
Stand right behind the ball, and as with the four-point.
- I’m going to start by getting the ball right up against my shins, placing my hands directly underneath my shoulders.
- I’m then going to push off with my heels.
- I’m going to come up onto my toes pushing off, letting myself come forward.
- From this forward position…so now from the four-point position, you want to center one hand.
- Whichever one you’re most comfortable starting with as your supporting hand, bring it to the center of the ball.
- The other hand is going to come up and initially, you could just practice lifting it off.
- As you get comfortable, start to bring your arm up to the height of your body so that you’re forming a nice, straight line.
- This is great for your lower traps, excellent back exercise, great for your shoulders and your postural alignment.
- Bring it back down.
- Now, the hand that you just lifted is going to replace your other supporting hand.
- At this point, if you need a rest, just take a rest.
- Go back.
- Otherwise, you can go and take it right from the right hand, bring your supporting hand with the left, lifting up.
- A 5 to 10 second hold is usually sufficient and then rock right back onto your feet.
And that’s it for the three point balance ball exercise with the arm lift.

3. Three Point Balance Ball Exercise with Leg Lift
The Three Point Balance Ball is a balance exercise from the Exercise for Better Bones program specifically designed for the Elite Level. This exercise should only be done with the correct sized and safe burst resistant physio or exercise ball. This is one the most difficult of the four balance ball exercises. Please make sure you are able to easily complete the first two ball balance exercises before trying this one.
3.1 Three Point Balance Ball with Leg Lift • Directions
It’s easiest to do the three point balance ball exercise by allowing a little bit of rolling of the ball.
You are going to need an additional 2 inches of play on either side. If I go back to the twin point, and I was in the arm position, that’s easy. You can do that without the ball shifting. Here are the step by step directions:
- Bring the hands back to shoulder width.
- Now that I want to transfer all my weight onto my left knee, I’m going to walk my hands on either side, so slightly to the left, so I’m creating a tripod now, between my left knee and my two hands.
- In creating that tripod, it’s going to allow me to take the weight off of my right leg and to bring myself into a three-point with my left hip being my supportive hip.
- And then I come back down after I do the hold, bring my hands back and now walk them on either side of my right hip.
- So again, I’m creating that tripod with the right hip, and I don’t have enough play so I’m going to just move that a little bit away.
- And again, just work on initially lifting, mastering that lift, getting the control and all the muscles around the hip, and then coming up into a three-point with the leg, and then back down.
- Bring yourself to the center and roll to complete the exercise.
3.2 Three Point Balance Ball with Leg Lift • Tips & Advice
If you’re just starting the three-point with the leg lift and you’re challenged with the shift of the ball and the change in the weight-bearing, a lot of my clients have found this method a little bit easier.
3.2 Three Point Balance Ball with Leg Lift • Tips & Advice
If you’re just starting the three-point with the leg lift and you’re challenged with the shift of the ball and the change in the weight-bearing, a lot of my clients have found this method a little bit easier.
You will start, instead of having both legs directly behind the ball, you’ll want to have one leg, the leg that you’re going to be doing the supporting on, being the center leg.
- You start out the whole exercise in your tripod position. I’m going use my right as my supporting.
- My left is going to be touching the ball, but most of the weight is going to be on the right.
- Say 80% of my weight is on the right, allow myself to come forward. I still have a little bit of weight on the left.
- Now I start to transfer all the weight as I lift my left leg up to the center.
So, I get the benefit of the three-point balancing, without having to do the shift, which requires a little bit more control and is something you can master afterwards.
4. Balance Ball Exercise Kneeling
If you want to increase the challenge and try the most demanding of the balance ball exercises, try kneeling on the ball (with no other support). This is the most difficult of the four balance ball exercises. Please make sure you are able to easily complete the first two ball balance exercises before trying this one. Here is the video demonstration:
Exercise for Better Bones
Exercise for Better Bones is an exercise osteoporosis program (that includes these balance ball exercises and more) designed for people like you. It is available for purchase at Amazon in printed book and Kindle formats.
It provides a safe and effective means to strengthen bone, reduce fracture risk, and build confidence. The Program has been successfully used by thousands of MelioGuide clients worldwide.
And hundreds of Physical Therapists and Physiotherapists have prescribed the Program for their clients.

Balance Exercises for Seniors Guidelines
For more information, check out my Balance Exercises for Seniors guidelines.

Comments