Table of Contents
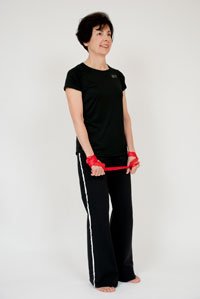
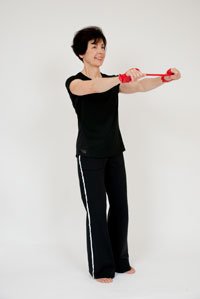
In this blog, I demonstrate the Bow and Arrow exercise. It is one of the Beginner level Strength exercises in the Exercise for Better Bones program and is designed to strengthen the upper and middle back muscles, as well as target the spine.
Bow and Arrow Exercise • Description
With your bow and arrow exercise you’re going to need your Theraband.
I encourage you to refer to your exercise safety tips as to how to place it around your wrist, so that you’re not having to strain the little joints in your fingers.
Once the Theraband is in place, you may want to actually double and triple it around your hand and wrist.
Unlike the reverse fly, where you have a really long lever, the bow and arrow exercise has a smaller lever. You’re only going to need to have about 12 inches of Theraband between your hands.
Next you’re going to stand with your feet shoulder width apart, or hip width apart, and about four to six inches from the wall.
Then rest your buttocks up against the wall. You’re going to always have a little bit of space, the space that your hand would fit into in the small of your back.
Then you want to get your best posture alignment up against the wall.

Bow and Arrow Exercise • Postural Alignment
- In your very best alignment try to get your head an inch, or a half an inch, from the wall.
- Keep it in that position.
- Sometimes I like to use a little cork wedge. That might work for you. A folded towel or a little face cloth can also do the trick.
- If the wedge support (or the towel or facecloth) helps you hold that best alignment, then I encourage you to do so. That way when you’re doing your bow and arrow exercise, if you have tendency of letting your head come forward, it will help you correct that.
- In this position with arms down by your side, raise your arms so your thumbs are facing one another.
- Breath in.
- Your left arm is going to be your anchor, and you are going to pull back with the right.
- Your elbow comes back.
- Your hand comes right in front of your shoulder.
- Return to start position and down.
- Alternate sides.
- Breath in, squeeze your shoulder blade back as you bring your elbow out and back to meet your other hand, and down again.

Bow and Arrow Exercise • Key Points
- As you raise your arm up (your anchoring arm) do not totally lock it.
- Make sure you have a little bend.
- As you bring your hand back, do not place the elbow up higher than the shoulder because that is going to cause some impingement and potential pain in the shoulder.
- The elbow is always slightly below the height of the shoulder and the hand’s right in front of the shoulder.
- The other thing I see a lot of people with weak wrists do is bend or extend the wrist.
- Ideally you want to keep your wrists in a nice straight line with your forearm.
Bow and Arrow Exercise • Repeat
- So let’s start again, keep long through the back of your neck.
- Just a hand’s width space in your back.
- Take your breath in. As the arms come up, exhale and pull back.
- As you’re pulling back really focus on the shoulder blade being squeezed toward your spine.
- Come back and down.
- One more time, opposite side.
- Shoulder blade pulls in toward your spine as your hand comes in front of the shoulder and back down.
- I’m just going to do it without talking, so you can see the pace of it.
And that’s the bow and arrow exercise against the wall.

Bow and Arrow Exercise • Tip for Professionals
Osteoporosis Exercise Plan
Visit my Osteoporosis Exercise Plan page for more information on this topic.

Comments
October 30, 2018 at 6:05pm
Jacqueline Wallen
Thank You Margaret for the week full of tips and advice, I have purchased the book "exercise for better bones" I am reading it and have selected the Active course to progress from. I felt completely lost when first diagnosed with osteoporosis but with a lot of research and your extremely valuable advice, with safe exercises to perform I feel energised and positive.
Thank you so much x
October 31, 2018 at 9:46am
Margaret Martin replies
Hi Jaqueline, I am so pleased that you have found the free 5 day course helpful and that you have purchased Exercise for Better Bones to allow you to feel in control of your body. Thank you for taking the time to share your experience. All the best.
Margaret
October 31, 2018 at 9:45am
gail katz
Thanks for this Margaret! Can you tell me, what is this exercise for specifically? Thanks.
October 31, 2018 at 7:35pm
Margaret Martin replies
Hi Gail,
It is a Beginner exercise that targets your rhomboids, middle trapezius muscles as well as spinal extensors. All these muscles are attached to your spine and help with improved posture and developing mid back strength. As you continue to develop the strength, you can progress to more challenging exercises that allows higher strain rates that reduce bone loss. Thank you for asking.
Keep well,
Margaret
November 8, 2018 at 10:20am
umashankar
thank you so much mam i learnt this exercise