Table of Contents
You can improve your balance at home with very simple equipment. In over 40 years of clinical practice as a physical therapist, one of my favourite tools for balance training has been the rocker board, an inexpensive, low-tech device that delivers real, measurable improvements in stability and confidence.
In this guide, I’ll walk you through exactly how to use a rocker board safely, show you a step-by-step exercise progression, explain the difference between a rocker board and a wobble board, and share balance exercises you can do without any equipment at all.
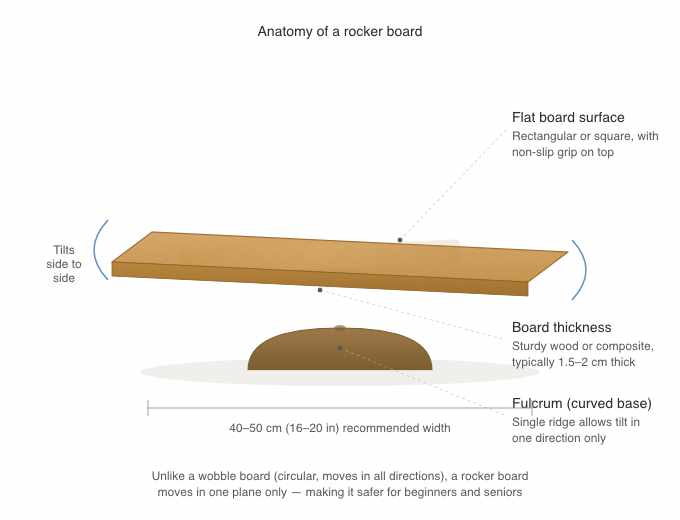
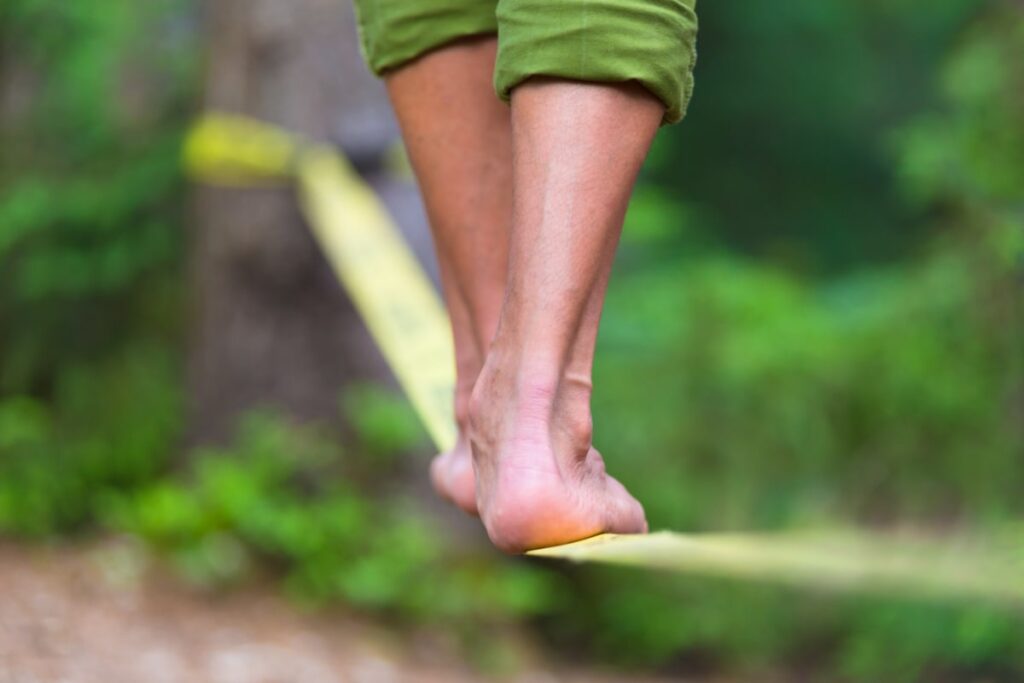
What Is a Rocker Board?
A rocker board is a flat, rectangular or square board attached to a curved base (called a fulcrum) that allows the board to tilt in one direction, either side to side or front to back, depending on how you position it. This single-plane movement makes it one of the safest and most accessible balance training tools available.
Rocker boards have been used in physical therapy clinics for decades to help patients recover from ankle injuries, rebuild stability after surgery, and improve balance in older adults. The controlled, predictable motion gives your body a manageable challenge, enough to activate the muscles and sensory systems responsible for keeping you upright, without the unpredictability that can make other balance devices feel unsafe.
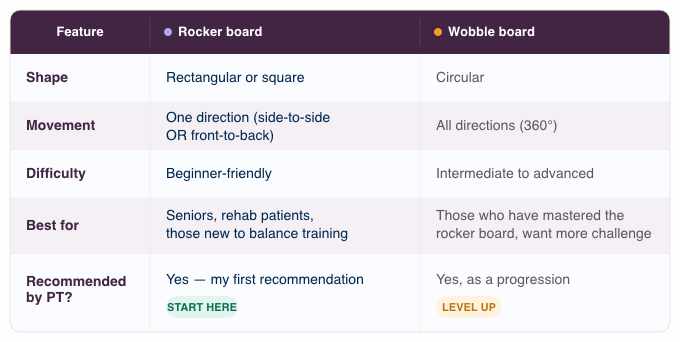
You’ll sometimes hear the term “balance board” used to describe several different devices. Here’s what matters: a rocker board moves in one direction, which makes it ideal for beginners and seniors. It’s the device I recommend most often to my clients.
Rocker Board vs Wobble Board: Which Is Right for You?
One of the most common questions I hear from clients is whether they should get a rocker board or a wobble board. The answer depends on your current balance ability and your goals.
My recommendation: start with a rocker board. Once you can comfortably stand on it without holding onto anything and perform the exercises below, you’re ready to consider progressing to a wobble board for a greater challenge. There’s no rush, many of my clients use a rocker board for months or even years and continue to see benefits.
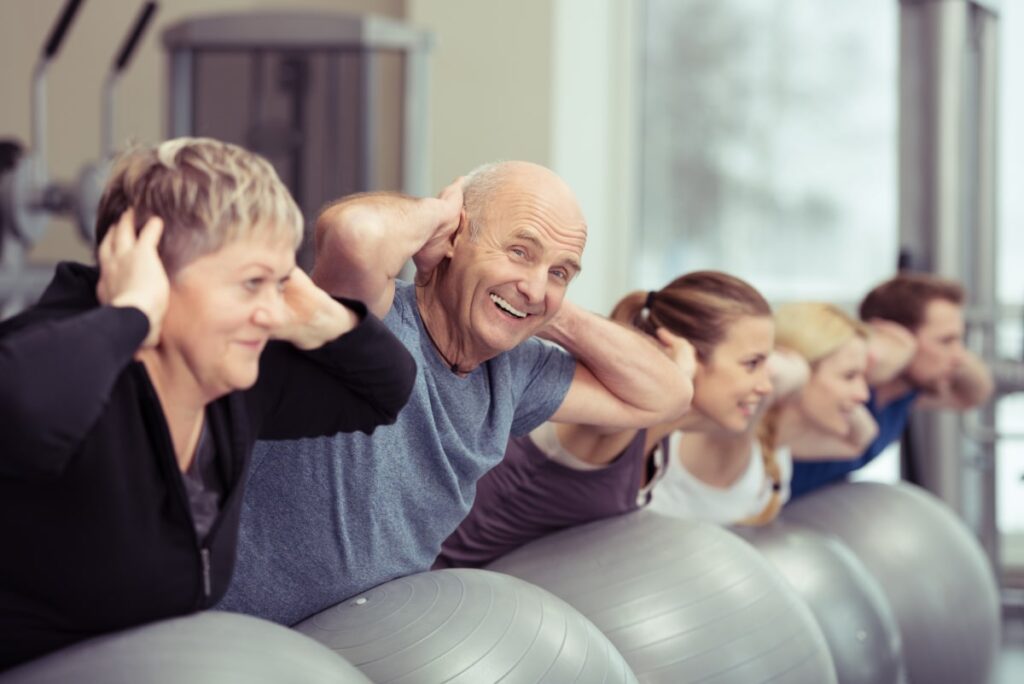
Benefits of Rocker Board Balance Training
You might wonder if something as simple as standing on an unstable board a few minutes a day can really make a difference. The research and my clinical experience both say yes. Here’s what regular rocker board training can do for you:
- Improves proprioception. Proprioception is your body’s ability to sense where it is in space, it’s what allows you to walk on an uneven path without looking at your feet. This sense naturally declines with age, but balance board training has been shown to improve it. A study of older adults found that just nine weeks of balance board training, twice per week, led to significant improvements in standing balance (1).
- Strengthens the ankles, knees, and hips. When you stand on a rocker board, the muscles around your ankles, knees, and hips activate continuously to keep you stable. Over time, this builds the kind of strength that protects these joints during everyday activities like walking on uneven ground, climbing stairs, or stepping off a curb.
- Activates your core. You might not feel like you’re doing an abdominal workout, but standing on a rocker board engages your deep core muscles, the ones responsible for stabilising your trunk and maintaining upright posture.
- Reduces fall risk. This is the one that matters most for my clients. Research has shown that proprioceptive training using balance boards can reduce the risk of ankle sprains and falls (2). For anyone with osteoporosis or osteopenia, preventing a fall is one of the most important things you can do to avoid a fracture.
- Builds confidence. This benefit doesn’t appear in research papers, but I see it in my clinic every week. When clients feel more stable on their feet, they’re more willing to go for walks, travel, and stay active, which feeds a positive cycle of improved health and independence.
How to Choose a Rocker Board
I recommend the Fitterfirst brand of rocker boards. If you cannot purchase one of these or want to choose your own, here’s what to look for:
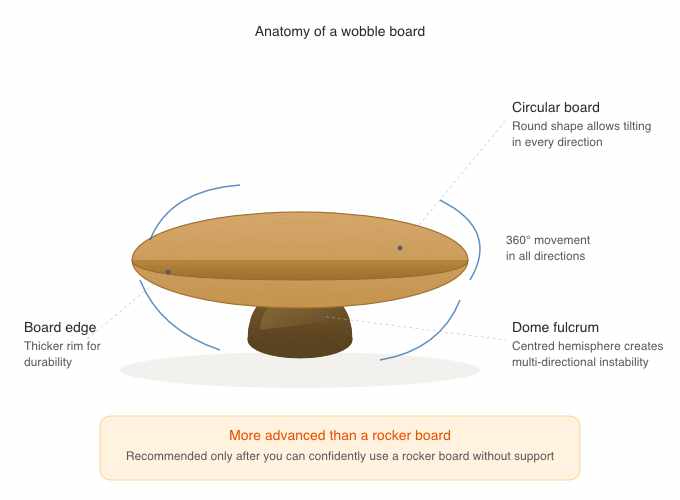
- Shape: Choose a rectangular or square board. Avoid round boards, those are wobble boards and are more advanced.
- Surface: Look for a non-slip top surface. Some boards have a textured grip built in; others are smooth and benefit from placing a thin non-slip mat on top.
- Fulcrum height: A lower fulcrum means a gentler tilt and a more manageable challenge. If the board has an adjustable fulcrum or multiple angle settings, that’s ideal because you can increase difficulty as you improve.
- Size: A board that’s approximately 40–50 cm (16–20 inches) wide gives you enough standing room. Anything smaller can feel cramped.
- Weight capacity: Make sure the board is rated for your weight. Most quality boards support at least 120 kg (265 lbs).
Rocker Board Exercises: Five-Step Progression
I’ve used this progression with hundreds of clients over the years. The key is to only move to the next step when you feel genuinely comfortable and confident at the current one. There is no timeline, some people spend a day at each step, others spend a week or more. Both are perfectly fine.
Setup: What You Need
- A rocker board (rectangular or square)
- Two sturdy chairs or a kitchen counter you can hold onto
- Two thick books, folded towels, or small pillows
- A flat, non-slip surface (avoid thick carpet or rugs)
- Supportive, non-slip footwear
The Progression
- Stand between two supports with range limiters. Place your rocker board between two sturdy chairs. Position a thick book or folded towel on either side of the board on the floor, these act as bumpers that limit how far the board can tilt. Step onto the board while holding both chairs. Simply stand and get used to the feeling of the board shifting slightly beneath you. Hold for 30–60 seconds. Repeat 3–5 times.
- Reduce the range limiters. As your confidence grows, switch to thinner books or thinner towels, or fold them differently so the board can tilt a bit further. Keep holding the chairs for support. Practice until you can comfortably shift your weight from side to side with control. Aim for 1–2 minutes of continuous standing.
- Remove the range limiters. Once you’re stable with minimal bumpers, remove them entirely. You’ll now feel the full range of the rocker board. Continue using the chairs for hand support as needed. Practice controlled weight shifts: slowly rock the board to one side, pause, then shift to the other side. Work up to 2–3 minutes.
- Reduce hand support. Start with fingertips on the chairs rather than a full grip. As you improve, try one hand, then just hovering your hands above the chairs without touching. The chairs are still there as a safety net. You might find you need to go back to holding on some days, that’s completely normal. Aim for 2–3 minutes without support.
- Add movement challenges. Once you can stand on the board without hand support for 2–3 minutes, you’re ready to add exercises on the board.
Try these in order of difficulty:
Mini squats:
Stand on the board and slowly bend your knees 10–15 degrees, then return to standing. Keep your weight centred over the middle of the board. Start with 5 repetitions and build to 10.
Controlled weight shifts:
Deliberately tilt the board to one side, hold for 3–5 seconds, then shift to the other side. This trains the reactive muscles around your ankles and hips. Repeat 8–10 times per side.
Head turns:
While standing on the board, slowly turn your head to look over your right shoulder, then your left. This challenges your vestibular system and mimics the kind of balance demands you face in real life, like checking for traffic before crossing a street. Repeat 5 times per side.
Arm reaches:
Extend one arm out in front of you, then to the side, then overhead, all while maintaining your balance on the board. Switch arms. This changes your centre of gravity and trains your body to adapt. Repeat 5 times per arm.
How Often Should You Practice?
I recommend 3–5 sessions per week, 5–10 minutes per session. Consistency matters far more than duration. You’ll notice improvements in your balance and confidence within 2–4 weeks if you practice regularly.
If you miss a few days, don’t try to make up for lost time by doing a longer session. Simply pick up where you left off. Balance training is cumulative, every session counts.
Safety Precautions
A rocker board is a very safe tool when used correctly, but please keep these guidelines in mind:
- Always have a sturdy support within arm’s reach, especially when you’re starting out. Two chairs, a kitchen counter, or a wall corner all work well.
- Use the board on a hard, flat surface. Thick carpet or uneven flooring can cause the board to behave unpredictably.
- Wear supportive, non-slip shoes. Bare feet are fine once you’re experienced, but shoes provide better grip and stability when you’re learning.
- Stop if you feel dizzy, light-headed, or experience pain. These are signals to step off the board and rest.
- If you have acute vertigo, a recent lower limb fracture, or are recovering from surgery, consult your physical therapist before using a rocker board. In many cases a rocker board is part of rehabilitation, but the timing and setup should be guided by your therapist.
And one more thing that I always tell my clients: there is no prize for rushing. Progress at a pace that feels right for you. If step 2 feels challenging for three weeks, stay at step 2 for three weeks. That’s not a failure, that’s your body building the strength and neural connections it needs
Exercise and Balance Boards
Balance is critical to fall prevention, but are doing enough to build strong bones? Sign up below for my free seven day email course on osteoporosis and exercise. You will learn the fundamentals of safe and effective exercise if you have osteoporosis or osteopenia.
Free Email Course
Balance Exercises Without a Rocker Board
Not ready for a rocker board, or looking to supplement your board training? There are four variables you can adjust to progressively challenge your balance using nothing but the floor beneath your feet. These are the same progressions I use in my Exercise for Better Bones programme at the beginner and active levels.
- Foot position. Narrowing your base of support makes balance harder. Start with feet hip-width apart, then progress to feet together, tandem stance (one foot directly in front of the other), and eventually single-leg standing. Each narrower position forces your body to work harder to stay upright.
- Surface type. Standing on a firm, flat floor is the easiest. Progress to standing on a folded towel, then a pillow, then a foam pad. Each softer or more uneven surface increases the challenge to your balance system.
- Visual input. Your eyes play a huge role in balance. Try your standing exercises while turning your head slowly side to side, then while looking up and down, and eventually with your eyes closed. Removing visual input forces your proprioceptive and vestibular systems to take over.
- Arm position. Having your arms out to the sides for balance is easier. Progress to arms across your chest, then arms overhead. Moving your arms while standing further challenges your stability.
You can combine these variables for an almost unlimited number of balance challenges. For example, standing on a folded towel with your feet together and your eyes closed is genuinely difficult, even for people who consider themselves well-balanced.
The balance exercise routine below will help you build up to comfortably using the rocker board.
Safety and Postural Cues
Before you begin, find a comfortable location between two sturdy supports that are a little less than arm’s width apart. As you stand:
- Lightly engage your abdominals and think “nice and tall.”
- Soften the knee of your standing leg, do not lock it.
- Stretch the space between your toes and anchor through your feet.
- Do not let your lifted leg touch your supporting leg.
The Hierarchy of Difficulty
Progress through these levels as your balance improves. Only advance to the next level when the current one feels stable and controlled:
- Level 1: Basic one-leg stand.
- Level 2: One-leg stand with head movements, side-to-side, up-and-down, or diagonal patterns from upper right to lower left.
- Level 3: One-leg stand with one eye closed, then both eyes closed.
- Level 4: One-leg stand on a soft surface, mimicking sand, trails, or thick carpet.
- Level 5: One-leg stand with eyes closed while moving the opposite leg forward, sideways, and back.
If you would like to see demonstrations of these progressions and many more, I have a complete Balance and Fall Prevention video series on my website that walks you through every level from rehabilitation to advanced.
The 10-Second Mastery Balance Blueprint
Improving your balance does not require a massive time commitment, but it does require specificity and consistency.
Here is the prescription I give my clients:
- Duration: Hold your specific challenge level for 10 seconds.
- Frequency: 10 repetitions scattered throughout the day.
- Focus: Prioritize your weak side to close the asymmetry gap.
The beauty of this routine lies in its accessibility. Because each repetition takes only 10 seconds, these exercises can be woven into your daily life, while brushing your teeth, waiting for the kettle to boil, or standing at the kitchen counter. Frequent, short bursts of “challenging the sensors” allow your nervous system to adapt quickly, eventually making your current challenge feel stable and allowing you to move up the hierarchy.

Margaret Martin
Further Readings

References
- Wiesmeier et al. 2011 — wobble board training in elderly, PubMed ID 21869636.
- Defined systematic review on proprioceptive training and ankle sprain prevention.
Comments